

How to Fix Banding on Sublimation Prints
Table of Contents
- What Causes Banding on Sublimation Prints
- Running a Sublimation Printer Nozzle Check
- How to Clean Sublimation Print Heads
- Print Head Alignment Sublimation: Step-by-Step
- Adjusting Print Quality Settings to Eliminate Banding
- Environmental Factors: Humidity, Temperature, and Paper Curling
- Advanced Causes: ICC Profiles, Ink Saturation, and Firmware Updates
- Preventative Maintenance Schedule for Banding-Free Prints
- Frequently Asked Questions
Last Updated: September 2, 2026
What Causes Banding on Sublimation Prints
Banding appears as visible horizontal lines or uneven color gradations across your sublimation prints. The issue typically stems from one of three categories: mechanical problems with your printer, environmental conditions affecting ink and paper, or configuration settings that don't match your specific equipment and materials.
Clogged nozzles represent the most common culprit. When sublimation ink dries inside the print head, it blocks the flow of ink to specific nozzles, creating gaps in the printed image where those nozzles can't deliver color. Print head alignment problems also trigger banding, if nozzles aren't perfectly calibrated to fire in sync, different color channels print slightly offset, creating visible stripes. Ink starvation, when ink can't reach the nozzles fast enough due to air bubbles, clogged tubes, or insufficient pressure, causes another form of banding.
Environmental factors like humidity and temperature affect how sublimation ink behaves. High humidity causes paper to absorb moisture and curl, changing the distance between the print head and paper surface, which creates uneven ink transfer. Low humidity causes ink to dry too quickly, leaving incomplete color saturation in bands.
Running a Sublimation Printer Nozzle Check
A nozzle check prints a test pattern that reveals which nozzles are firing and which are blocked. This diagnostic is your first and most important troubleshooting step.
Steps to run a nozzle check:
- Load plain paper into your printer (not sublimation transfer paper)
- Access your printer's maintenance menu from the control panel or printer driver software
- Select "Nozzle Check" or "Head Cleaning Test"
- Press the button to begin the test
- Examine the output for gaps, missing lines, or faint sections
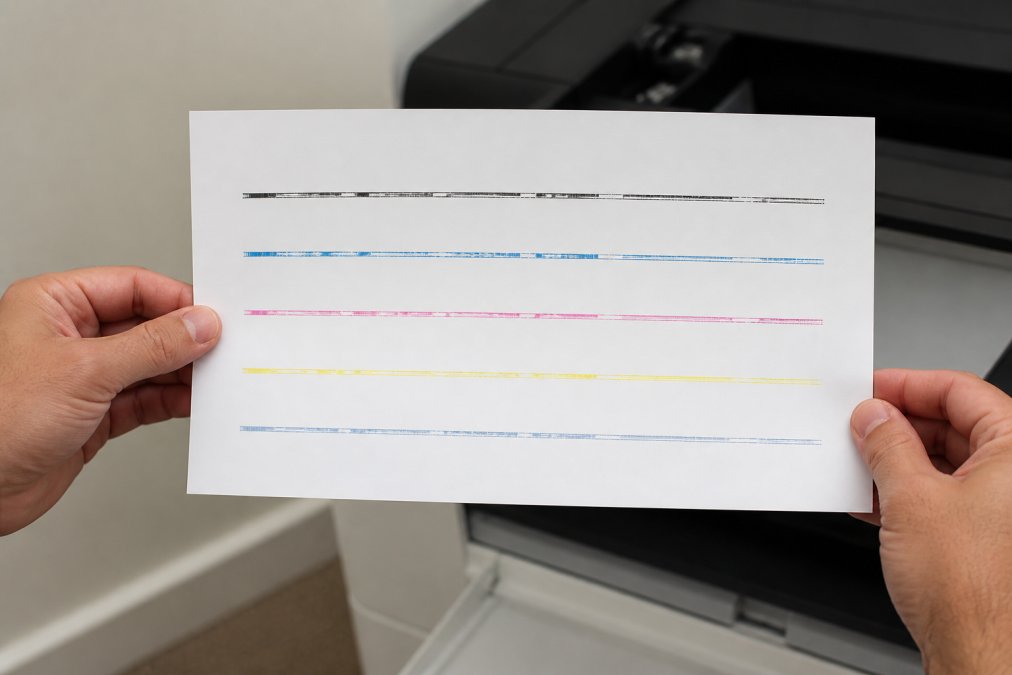
A healthy nozzle check shows solid, unbroken horizontal lines in each color channel. If you see gaps or faint lines, those areas correspond to clogged nozzles. Run the nozzle check before and after any cleaning procedure to establish a baseline and verify whether your cleaning effort worked.
How to Clean Sublimation Print Heads
Print head cleaning removes dried sublimation ink and restores ink flow to clogged nozzles using your printer's built-in cleaning cycles.
Standard cleaning cycle (try this first):
- Open your printer driver on your computer
- Navigate to Maintenance or Tools
- Select "Cleaning" or "Head Cleaning"
- Choose "Normal" or "Standard" cleaning
- Wait 3-5 minutes for the cycle to complete
- Run a nozzle check to verify results
Standard cleaning uses controlled amounts of solvent to flush dried ink through the nozzles. Most users find that one or two standard cleaning cycles restore normal printing.
If standard cleaning doesn't clear the blockage, move to a deep cleaning cycle:
- Return to the Maintenance menu
- Select "Deep Cleaning" or "Heavy Cleaning"
- Execute the cycle (10-15 minutes)
- Run another nozzle check
- If still blocked, wait 4-6 hours and repeat
Deep cleaning uses more aggressive solvent flow. Never run multiple deep cleaning cycles back-to-back, as repeated solvent exposure can damage seals and gaskets. For stubborn clogs that survive two deep cleaning attempts, manual cleaning may be necessary, involving removal of the print head and soaking it in approved sublimation solvent overnight.
Print Head Alignment Sublimation: Step-by-Step
Print head alignment ensures that each nozzle fires at precisely the right moment so all color channels overlap perfectly on the paper.
Your printer has an automatic alignment function built into the maintenance menu:
- Load plain paper into the printer
- Open the printer driver and navigate to Maintenance
- Select "Head Alignment" or "Print Head Position"
- Choose "Automatic Alignment"
- Execute the process (typically 2-3 minutes)
- Print a test page to verify alignment improved
Automatic alignment works for most users. If it doesn't resolve the banding, manual alignment may be necessary. This process varies by printer model, but generally involves printing an alignment pattern, measuring the offset between color bands, adjusting alignment values in the printer driver, and reprinting to verify. Make small adjustments, large changes often overshoot the target.
Adjusting Print Quality Settings to Eliminate Banding
Your print driver settings directly control how sublimation ink is applied to paper. Incorrect settings create banding even when your hardware functions normally.
Key settings to review:
Print Quality Mode: Select "High Quality" or "Best" instead of "Draft" or "Fast." Draft mode reduces nozzle firing frequency to speed up printing, which creates visible banding. High quality mode fires nozzles more times per pass, producing smooth gradations.
DPI (Dots Per Inch): For sublimation printing, 1440 DPI or higher eliminates most banding. Lower DPI settings like 360 or 720 DPI create visible stepping in color gradients.
Ink Density: This setting controls how much ink your printer applies per pass. Start with 100% density for sublimation work and adjust down only if you see ink overflow or color bleeding.
Media Type: Select "Sublimation Transfer Paper" or the specific brand you're using. The printer adjusts ink delivery based on the paper's absorption characteristics. Selecting the wrong media type causes uneven ink absorption and banding.
Bidirectional Printing: This setting controls whether the print head fires in both directions or only one. If you see vertical banding patterns, try disabling bidirectional printing to force unidirectional printing only. This is slower but more precise.
Environmental Factors: Humidity, Temperature, and Paper Curling
Your printing environment has as much influence on banding as your hardware settings. Humidity and temperature affect how sublimation ink transfers to paper and how the paper itself behaves.
High humidity (above 70%) causes sublimation transfer paper to absorb moisture and expand, changing the distance between the print head and paper surface and creating uneven ink transfer (peer-reviewed research). Low humidity (below 30%) causes paper to become brittle and curl at the edges, creating gaps where the print head can't reach the paper consistently. The ideal humidity range for sublimation printing is 40-60% (peer-reviewed research).
Sublimation ink behaves differently at different temperatures. Cold ink flows more slowly, causing incomplete nozzle firing and banding. Warm ink flows faster and transfers more readily to paper. Room temperature between 68-75°F is optimal (peer-reviewed research). If your environment is cold, warm your transfer paper before printing by removing it from its sealed bag 30 minutes before use.
Store sublimation transfer paper in sealed bags or containers with desiccant packs to maintain consistent humidity. Before printing, stack your paper flat on a hard surface for a few minutes to ensure it's flat. Curled paper creates the variable head-to-paper distance that causes banding.
Advanced Causes: ICC Profiles, Ink Saturation, and Firmware Updates
When standard troubleshooting doesn't resolve banding, the issue often involves color management or printer firmware.
ICC Profile mismatch: An ICC profile is a digital description of how your specific printer and ink combination produce color. If your design software uses the wrong ICC profile, the printer receives incorrect color data and produces banding. Download the correct profile from your ink supplier's website and install it in your design software, then select that same profile in your printer driver before printing.
Ink saturation and firmware: Ink saturation controls how much ink your printer applies in areas of solid color. Check your printer's control panel menu for "Ink Saturation" or similar options. The default is usually 100%, which is correct for most sublimation work. Firmware updates occasionally address banding issues, check your printer manufacturer's website for available updates.
Preventative Maintenance Schedule for Banding-Free Prints
Consistent maintenance prevents banding before it starts.
Weekly: Run a nozzle check every Monday before starting production. Verify that your transfer paper is stored in sealed, humidity-controlled containers.
Monthly: Run a standard cleaning cycle if the nozzle check shows any faint lines. Test print a color gradient to check for any banding in smooth transitions.
Quarterly: Run a deep cleaning cycle as a preventative measure. Clean the paper feed rollers with a lint-free cloth slightly dampened with distilled water.
Annually: Have your printer professionally serviced if you run high volume. Replace maintenance tanks if your printer uses them. Check all ink tubes and connections for cracks or leaks.
This schedule prevents most banding issues from developing. The combination of proper maintenance and high-quality ink, like the dye sublimation solutions we supply for Epson and Canon models, helps keep your printer producing consistent, vibrant output.
Banding on sublimation prints typically stems from fixable issues: clogged nozzles, misalignment, or incorrect settings. Start with a nozzle check, perform the appropriate cleaning cycle, verify your print quality settings, and check your environment. If banding persists after these steps, investigate ICC profiles and firmware updates. With Printer Ink Pro's compatible sublimation ink cartridges and maintenance tanks designed for Epson and Canon printers, you have the right tools to maintain peak print quality and eliminate banding permanently.
Frequently Asked Questions
Q: What is the difference between banding and nozzle clogs?
A: Banding appears as faint horizontal lines or gradual color shifts across your sublimation print, while nozzle clogs cause complete gaps or missing color lines. A nozzle check reveals clogs as broken patterns in the test output. Banding can result from clogged nozzles, but also from ink starvation, print head misalignment, or ICC profile issues. Clogs are one cause of banding, not the same condition.
Q: Does running a nozzle check actually fix banding on sublimation prints?
A: A nozzle check itself doesn't fix banding, it diagnoses the problem. The test pattern shows which nozzles are blocked or firing unevenly. Once you identify the issue, you run a cleaning cycle to unclog nozzles. If the nozzle check shows a complete pattern after cleaning, banding from nozzle clogs is resolved. However, if the pattern looks normal but banding persists, the cause lies elsewhere: alignment, ink saturation, or environmental factors.
Q: How often should I run a print head cleaning to prevent banding on sublimation prints?
A: Run a cleaning cycle weekly if your sublimation printer sits unused for more than a few days. If you print daily, a monthly cleaning is usually sufficient. However, if you notice horizontal lines or color shifts appearing, run a nozzle check immediately followed by a cleaning cycle. Frequent cleaning wastes ink; preventative maintenance means keeping your printer running regularly and storing it properly to avoid ink drying in the nozzles.
Q: Can low-quality sublimation ink cause banding?
A: Yes. Low-quality sublimation ink can cause inconsistent ink flow, leading to uneven color saturation and visible banding. Poor-quality ink may also clog nozzles faster, creating the horizontal lines typical of banding. Using quality sublimation ink from a trusted supplier ensures consistent viscosity and particle size, which reduces clogging and maintains proper ink saturation across your transfer paper. Ink quality directly affects print head performance and print quality.
This article was written using GrandRanker